Cluttered images don’t just distract. They make listings look unpolished and uninviting. This article looks at top photo editing tips for decluttering real estate photos to help create clean, high impact visuals that enhance listing quality and drive stronger buyer interest in the real estate market.
Contents
In the real estate industry, first impressions matter a lot. Property images help attract buyers and generate interest. According to the National Association of Realtors (NAR), 43% of all home buyers search for properties using the internet. Moreover, NAR reports that approximately 85% of all home shoppers say it was the photographs they saw online that influenced their decision to visit one property over another.
Given the importance of visuals in real estate marketing; there has been an explosion of real estate photo editing services particularly decluttering property photos. As such, the market size for photo editing service is expected to grow to USD $5.7 billion by 2033. Top real estate listing tips include removing unwanted objects from property photos so that potential homebuyers can focus on the space and layout of the property.
What Is Digital Decluttering in Real Estate Photography?
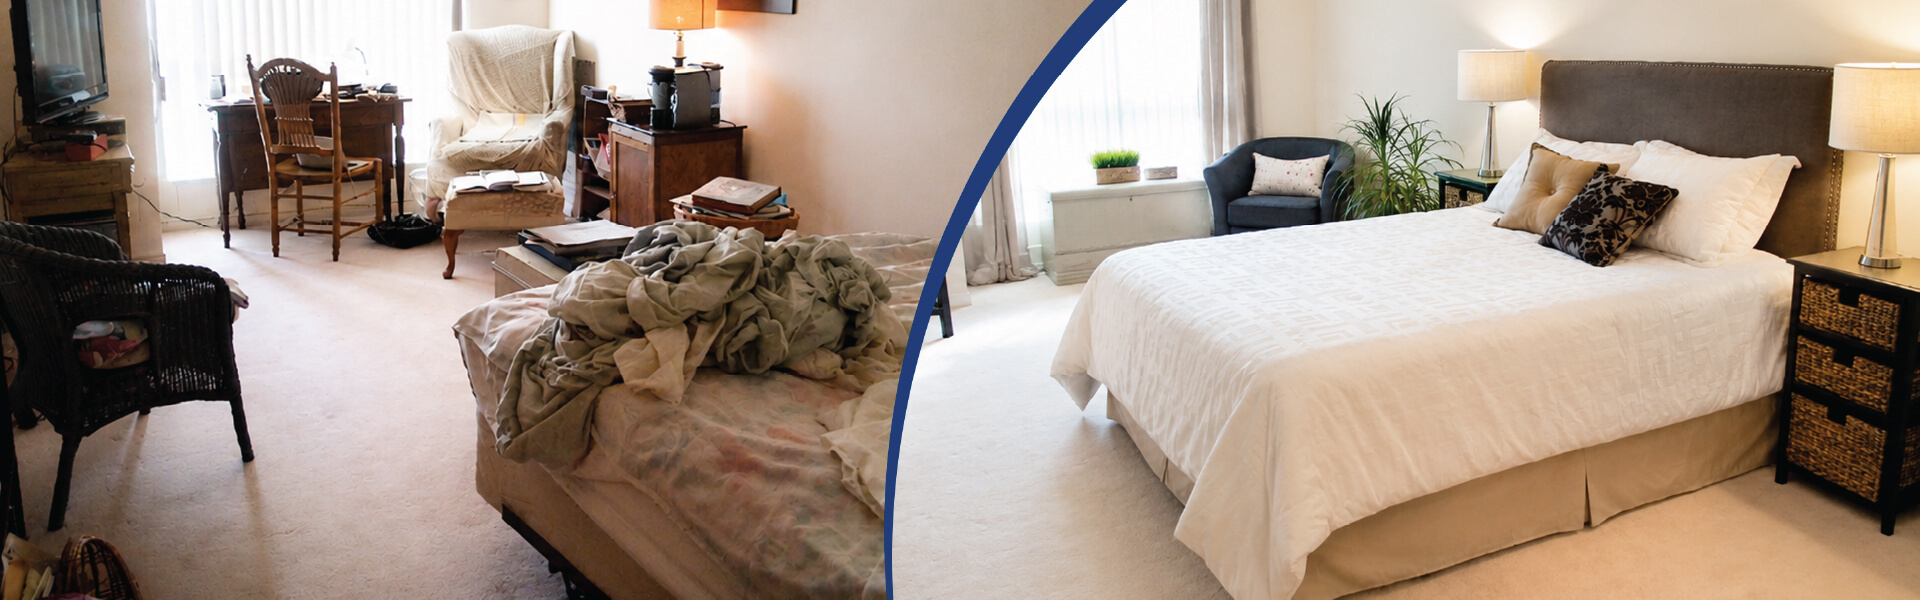
Decluttering property photos is generally defined as enhancing/improving real estate photographs by removing distracting elements with editing software. Digital decluttering corrects common mistakes made when editing real estate photos by removing personal belongings, oversized furniture, family photos, etc., and other unwanted items. For properties that cannot be cleaned or physically staged before a shoot, retouching photos can provide significant benefits.
When using simplicity & minimalism to create property photos that are clean, spacious, and visually appealing through digital decluttering, there is more engagement, faster decision-making and greater numbers of serious inquiries.
Examples of elements removed during digital decluttering
- Unwanted/personal items such as family pictures, toiletries, etc.
- Excess/oversized furniture that creates a smaller appearance than reality
- Clutter/messy countertops/floors
- Poor lighting, reflections and artifacts
5 Benefits of Decluttering Property Photos
The use of digital decluttering in real estate photography allows you to show the best aspects of your property. It provides an overall appearance of cleanliness which promotes viewer interaction and improves performance when it comes to your online listing. The act of removing distractions (clutter) in photographs will create an impression that makes each room appear larger and have a brighter feel. Ultimately, this results in quicker sale transactions through the development of an emotional appeal and clarity.
These are some additional advantages of utilizing digital decluttering as part of your property photographs:

1. Boosts visual appeal and buyer interest
Digital decluttering focuses the eye on the architectural details, lighting and spaciousness of a property by eliminating unwanted items. The end result is a clean, well-polished image that provides a positive first impression, and sets your property apart from other properties. By having clear visuals of what makes a property unique, you increase the likelihood of viewers clicking, exploring further and developing legitimate interest.
2. Helps buyers envision living there
Once clutter has been removed digitally, the focus is shifted from what belongs to the current homeowner, to the structural design/layout/possible uses of the property.
As a result, homeowners can better visualize using their own furniture and lifestyle within the property. This increased sense of ownership/emotional attachment often leads to faster and more decisive decisions regarding purchasing a new home.
3. Improves listing performance online
Listings with professionally edited, clutter-free images generally receive a higher number of clicks per day, extended viewing periods, and greater inquiry levels. Given the number of consumers who search for homes online, professional looking photos greatly affect consumer interest.
Optimized visually, listings will hold a viewer’s attention and generate competitive interest. Agents and Sellers will gain a measurable edge in the increasingly competitive world of digital marketing.
4. Saves time, money, and effort
In cases where physically staging a property is either impossible due to being occupied by tenants, too much pressure to meet scheduling deadlines, or limited budgets; digital decluttering provides a fast, cost-effective alternative.
It removes the need to physically clean up or stage the location resulting in agents presenting polished, marketable property at no great inconvenience or expense.
5. Strikes a balance between realism and compliance
While virtual home staging shows an idealized version of your home; digital decluttering presents a realistic view of your home with an enhanced photo image quality. This “honest” representation of your home is compliant with MLS and Property Portal regulations and avoids over-editing.
Want to declutter and enhance your property photos with professional editing.
Consult Our Team »8 Expert Property Photo Decluttering Tips for Better Listings
Property photos often decide whether a buyer clicks or keeps scrolling. The right editing can improve clarity, balance, and visual appeal, helping your listing capture attention faster. Here are eight practical photo editing tips that make property images work harder online.
Tip 1: Correct perspective distortion before touching a single object
Perspective correction is step #1. Not something to think about later. The wide-angle lens (16-24 mm) introduces keystone distortion, which converges vertical lines to the top of the frame.
When using content-aware fill prior to correct perspective it creates warps on the areas you filled; this can cause additional seam lines requiring re-edits.
Lightroom’s Guided Upright tool
- Draw two vertical lines as close to the center of your image as possible against some structural elements, such as door frames, or windows. Use two horizontal lines across counter tops or walls.
Photoshop’s Perspective Warp (Edit > Perspective Warp)
- Identify the layout plane. Adjust the corner handles individually in warp mode.
The Camera Raw Transform panel offers Auto-Upright as a starting point; however, most times requires fine tuning for MLS standard photography.
To photograph residential interiors correctly, align your camera’s horizon at approximately 1/3 of your frame from the floor level; if the horizon is misaligned, it will appear to shrink the apparent ceiling height and create smaller rooms.
First fix perspective. All other edits will be clean composites.
Tip 2: Normalize exposure and white balance before any selective edits
Make sure the image is properly exposed and corrected for white balance before applying any local edits. In nearly every residential interior setting there will be at least some “mixed” lighting going on i.e., you’ll have a combination of:
- Tungsten Downlighting (~2700K)
- Natural Window Lighting (typically ~5500-~6500K)
- Accent LED Lighting (~3000-~4000K)
This means you’re dealing with at least 3 colors of light simultaneously in your space. As such, a consistently applied global white balance adjustment to your images is necessary before attempting to make local adjustments.
Step 1: Apply A Global White Balance Adjustment
Use a grey card or the nearest neutral color available as reference for your white balance correction. Open Lightroom’s develop module, click the white balance slider and use it to set a new white balance based upon the grey card/neutral color. Then click on sync and adjust this white balance across all photos of that room.
Step 2: Address Persistent Casts
If there is a problem with persistent cast (e.g. warm spots on countertops, cool tones in floors due to North-facing windows), use the HSL/Color Panel, or if you’re lucky enough to own Lightroom 2023 or newer, use the AI masking options provided by Lightroom (i.e. Select Subject, Select Sky, etc.).
Step 3: Blend for High Dynamic Range
When interior ambient light + exterior window light create contrast that no single RAW can capture, your solution is to blend bracketed exposures using HDR blending.
HabileData team handles HDR blending for real estate images at scale and allows you to merge 2, 3 or more exposures with very precise control over your blend masks. This provides you with the ability to avoid those nasty halo artifacts that Auto-HDR Software typically produces.
Why does sequencing matter?
Because content-aware fills work perfectly when they are applied to a properly corrected image. They fail miserably when the original image has been improperly corrected.
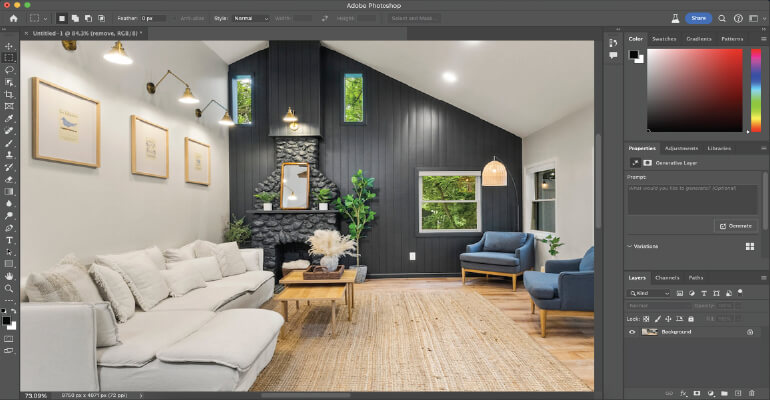
Tip 3: Using content-aware fill & clone stamp to cleanly remove objects
These two editing tools are the most commonly used methods for object removal in real estate photos. The biggest reason that objects don’t come out cleanly; however, is based upon which tool you choose to edit your background based on what type of material it is made of.
- Content-Aware Fill, Non-Linear Backgrounds (Tile, Stone, Patterned Wallpaper)
- Duplicate the bottom layer; Select the item you want to remove using the Object Selection Too
- Expand the selected area by 2-3px (Edit>Modify>Expand)
- Edit>Edit>Content Aware Fill; Select an area to Sample from (using the Sampling Brush), where possible, avoid sampling any of the unwanted textures.
Clone Stamp: Straight Lines (Countertops, Window Frames, Skirting Boards) Content Aware will always mis-align grout lines and moulding profiles on these types of surfaces.
Use Clone Stamp on a separate Layer, and ensure Aligned Mode is Off so you have complete control of your Source.
Frequency Separation: Marks/Stains on Smooth Surfaces (Painted Walls, Glossy Floors) This technique allows you to edit both Color and Luminosity Independently. Therefore, you can maintain the Texture of the Surface while keeping away from that dull look when using a standard Healing Brush.
Always Duplicate Layers or create Smart Objects, When working in a Flattened File, re-editing is exponentially harder than if done on a duplicated or Smart Object Layer.
Tip 4: Recover window views with luminosity masking, not just sky replacement
The blown-out windows are among the most frequent failures of quality in indoor real estate photography. The interior can be corrected to expose properly at 4-6 stops higher than the outside exposure so that an area which would otherwise appear as a white hole becomes a usable selling point.
- Use luminosity masks when the actual view of the exterior is worth saving.
- Open both images as layers in Photoshop (the interior image on top of the exterior image).
- Load the luminosity channel as a selection from the interior layer (right-click/control+click composite channel thumbnail).
- Select inverse (inverse) and add a layer mask (layer > layer mask > reveal all); the properly exposed exterior should be visible through the window opening.
Refine edges of the mask using Select & mask > smart radius with Refine Edge Brush. For grille patterns that are more complex than those described above, painting manually at 100 percent zoom will typically prove faster than automated detection.
Looking for expert real estate photo editors bringing precision to every image?
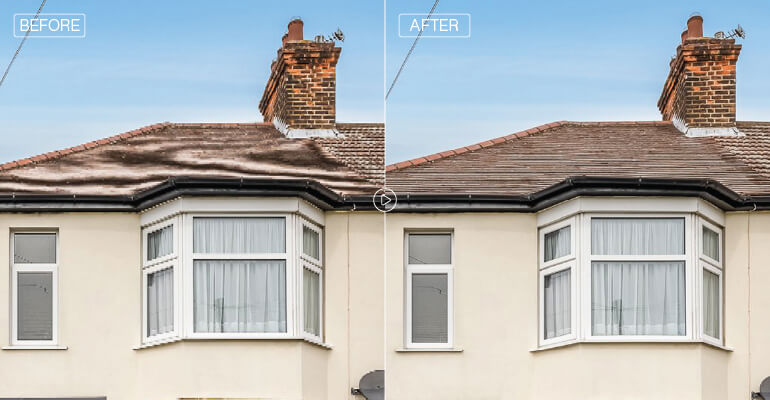
Contact Us Today »Tip 5: Apply sky replacement where the exterior needs it, with MLS compliance in mind
Photoshop’s Sky Replacement (Edit > Sky Replacement) uses AI-based edge detection that can create clean masks of the sky from all objects including roofs, trees, architectural silhouettes, etc., providing a good way to replace the sky when you have a relatively simple exterior shot.

Complex geometry requires manual refinement
In most cases, this includes manually refining chimneys, dormers, balustrades, and pergola to remove the artificial “edge” created by the algorithm.
To fix issues like these, try Selecting Subject first, which allows you to select just the building; once selected, you can invert the selection so the subject is no longer selected, leaving only the sky; after selecting the entire image again, you can refine your selections using the Pen tool for harder edges (such as those found on chimneys and/or along the top of a pergola), and the Refine Edge Brush for softer edges such as foliage.
MLS Compliance
A replacement sky needs to look photographically correct for the property’s location and active listing time period. While creative and/or editorial type skies may add interest to your photos, they are generally unacceptable for listing purposes.
Clean blue skies, scattered cumulus, or a flat white overcast sky are usually acceptable. Most MLS boards and RERA equivalent organizations require their listed properties’ images to accurately represent the property’s true surroundings.
Photographing a beautiful sunset while shooting at mid-morning or capturing tropical looking clouds while photographing in a property located in a temperate climate, could be considered red flags for potential buyers viewing the listings on platforms as well as by compliance reviewers.
Tip 6: Remove the three reflection and artifact types that most editors miss
Even when there are no object to be removed, three types of artifacts can appear visually distracting because they can be seen as clutter.
Photographer Reflections
Glass cabinets, oven doors, TV screens use healing brush or clone stamp on duplicate layer for small photographers. As far as fixing larger mirrors go, if you use the healing brush only, it will take you hours to do, but even then, most of the time it won’t look like it was cleaned.

Lens Flare
Downlights and direct window light use the patch tool for discrete flare on clean surfaces. If the flare persists, before using patch tool to remove flare, make sure to use negative de-hazing slide in Camera Raw to lower flare contrast so that subsequent cloning will have less of an effect.
Chromatic Aberration
Magenta or Cyan Fringe on High Contrast Edges Fix CA in RAW stage and not after exporting out as a JPEG. In Lightroom/Camera Raw: Lens Corrections > Remove Chromatic Aberration should always be used as your base line for CA corrections, followed by manual defringe sliders for remaining fringe.
Fixing CA on an already exported JPEG will require sample from an image’s edge to remove chromatic aberrations; this will produce unreliable results.
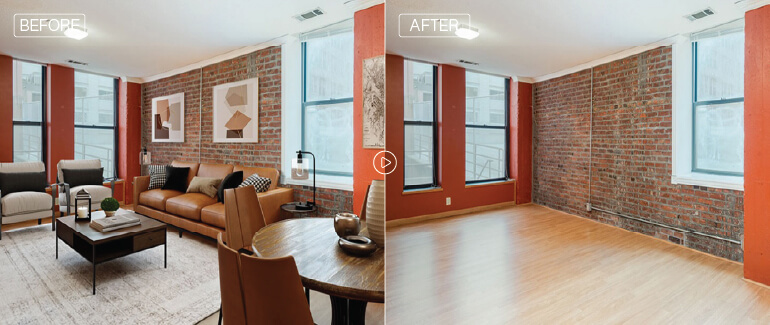
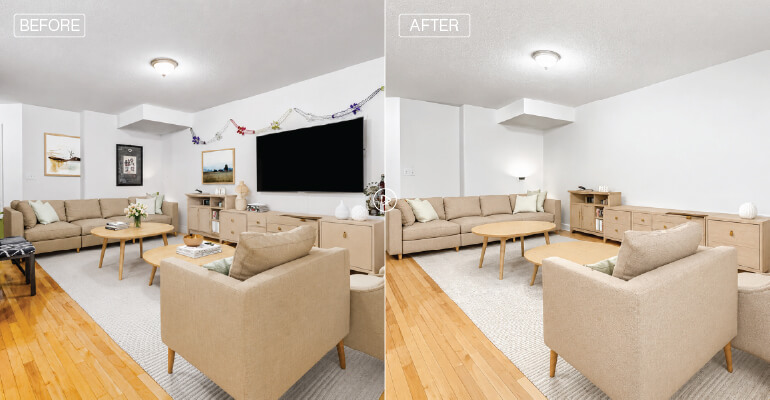
Tip 7: Using virtual decluttering to remove existing furniture and personal items from occupied listings
In comparison to virtual staging, which typically involves adding new furniture into an empty room, virtual decluttering will remove all of the current furniture and items found within a space. For many occupied listings, you would need to use these two processes in succession: virtual decluttering followed by selective virtual staging.
Setup & Capture
Set your camera up to shoot at 5ft high with a 16-24mm rectilinear lens. If it’s feasible, take reference shots of key flooring and wall areas using the same shooting location but removing obstructions, if possible. This can save you a lot of time when reconstructing your scenes. Reference shot of a 60cm section behind a sofa provides ample material to allow for quick construction of your scene.
Pipeline Editing
Use content-aware fill to build out your backgrounds, while combining reference frame compositing where applicable. It’s surprising just how many people miss one major editing task: specular reflection handling.
When you have objects on wood floors, polished concrete, or stone surfaces, they create specular reflections. When those objects are removed, so do their reflections leaving you with dark spots on the floor that read like an obvious edit. To solve this problem: apply frequency separation to separate the luminosity layer from the color layer; and then use a large soft brush to lightly paint in the missing highlight area. Make sure to match the gradient from adjacent floor areas.
According to Virtual Staging AI, homes photographed after being professionally edited were listed for sale for 34 fewer days than those with less-than-professional photography, 89 days compared to 123.
For listings occupied by tenants, virtual decluttering may be the best method to prepare a property before listing. Contact HabileData and find out about our virtual home staging and decluttering service workflows for more information.
Tip 8: Standardize your output images to meet the MLS specifications each time you deliver them
A perfectly retouched image can be useless if it is delivered in a format that does not allow the intended use. For example, a beautiful image shot in Adobe RGB will appear washed out when displayed on an sRGB platform any consumer monitor a potential client may use.
Standardization should include the following:
- Resolution: Deliver at a resolution of 1920 pixels on the longest side (72 ppi min.). Sharpen after cropping and/or resizing by applying an Unsharp Mask (amounts = 80-100%; radius = .08-.1; threshold = 2).
- Color Space: Always convert your image to sRGB IEC61966-2.1 for web-based delivery. All three major real estate websites (Zillow, Redfin and Realtor.com) display images using the sRGB color space. Therefore, any Adobe RGB images sent will show colors that are obviously different from those originally viewed (and less saturated) on monitors which are not color managed.
- File Format and Compression: JPEG at a compression level of 80-85% (quality = 10-11 in PS save for web/lightroom export). A quality of 12 will produce files approximately 2-3 times larger than files produced at a quality of 11. Although WebP has been recently accepted for gallery hosting on some websites, it appears to result in files about 30% smaller than similar quality JPEGS.
- IPTC Data: Add Copyright Information, Photographer Credit, and Property Address to your images prior to sending. This helps protect your intellectual property rights while also improving how they are indexed by google images. Tagging data is far more reliable in finding your images than untagged data.
- Batch Exporting: Batch exporting via either Lightrooms “Export with Preset” function or Photoshop’s “Image Processor” (file>scripts>image processor) function will greatly simplify delivering multiple formats.
Each preset you create can be configured differently for various platforms such as Zillow, Realtor.com and Regional MLS Boards who vary their maximum file size and required aspect ratios.
Conclusion
The advantages of decluttering your property photos are twofold. First, cluttered photos may deter potential buyers from scheduling an in-person view prior to seeing your home. Second, well-lit, professionally photographed, and virtually decluttered photos will draw a viewer’s eye, generate curiosity, and provide a clean initial visual image.
Occupied homes or time constraints, budget limitations do not hinder the effectiveness of virtual decluttering. Additionally, combining this process with professional photo editing produces superior lighting, composition, and overall photographic representation.
Decluttered real estate listing photos result in faster sale cycles, stronger purchase offers and increased trust by potential purchasers. Virtual decluttering is much more than just editing, it is investing in your marketing efforts.
Elevate your property listings with professional photo editing services.
Let’s Get Started »

Snehal Joshi , Head of Business Process Management at HabileData, leads a 500-member team of data professionals, having successfully delivered 500+ projects across B2B data aggregation, real estate, ecommerce, and manufacturing. His expertise spans data hygiene strategy, workflow automation, database management, and process optimization - making him a trusted voice on data quality and operational excellence for enterprises worldwide. 🔗Connect with Snehal on LinkedIn