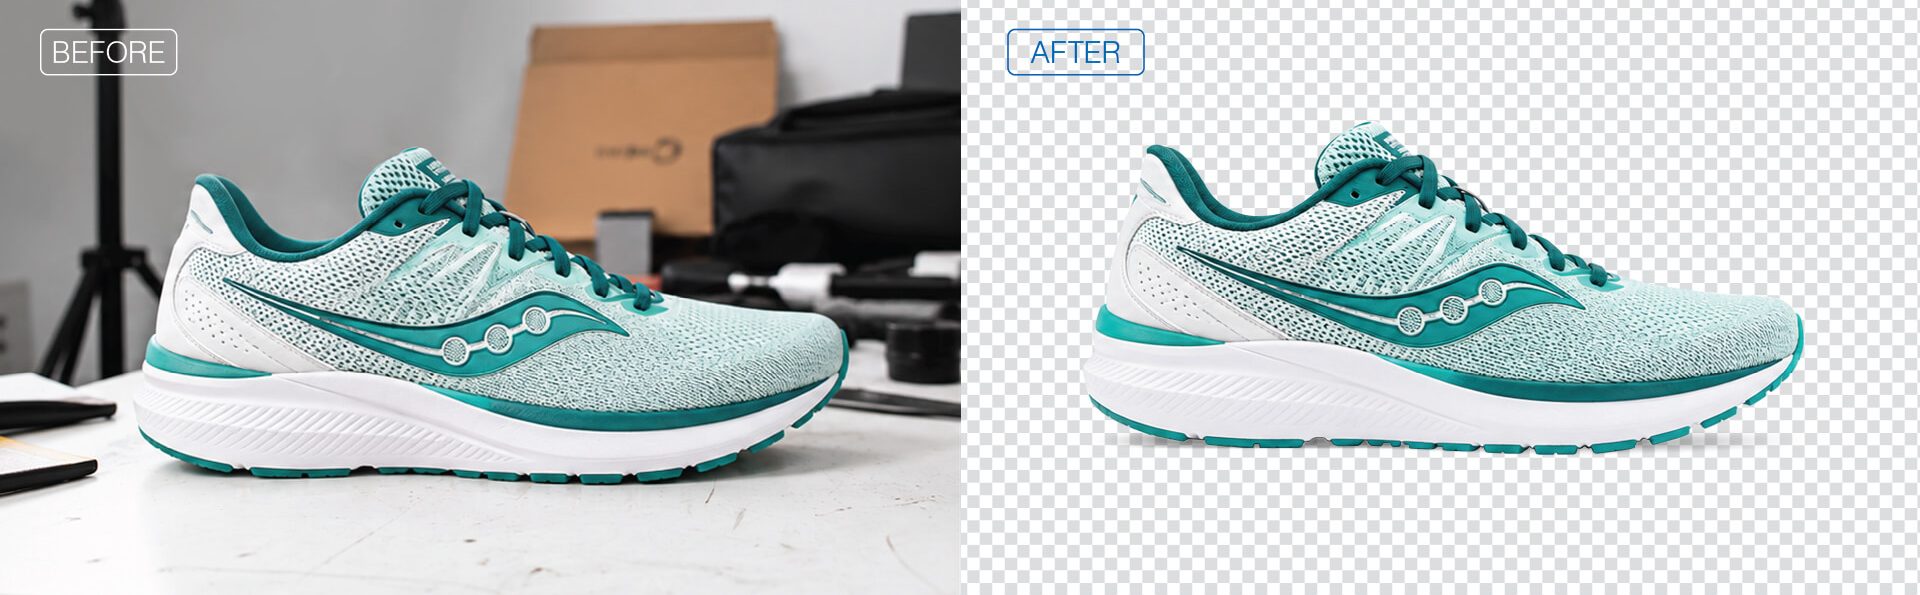
Open your image, select the layer, and click Remove Background in the Properties panel under Quick Actions. Photoshop’s Adobe Sensei AI isolates the subject and clears the background in one click. For hair, fur, or tricky edges, refine it afterward in the Select and Mask workspace (Method 5).
Contents
- Before You Start: The Step Most Beginners Skip
- Quick-Pick Guide: Which Method for Which Image?
- Method 1: Remove Background, One-Click AI (Fastest)
- Method 2: Object Selection Tool and Select Subject
- Method 3: Quick Selection Tool
- Method 4: Magic Wand Tool
- Method 5: Select and Mask Workspace
- Method 6: Pen Tool
- Method 7: Color Range Selection
- Method 8: Layer Masks
- Method 9: Background Eraser Tool
- Method 10: Channel-Based Masking
- New in 2026: Generative AI Background Tools
- Master Comparison: All 10 Methods
- Keyboard Shortcuts Cheat Sheet
- 5 Common Problems and How to Fix Them
- How to Save a Transparent Background Correctly
- Free Alternatives to Photoshop for Background Removal
- Where Background Removal Gets Used
- When to Outsource Background Removal
- Conclusion
- Frequently Asked Questions
You hit this task constantly in professional editing. Prepping product shots for an online store, pulling subjects out for a marketing layout, tidying up real estate photos – it all starts with removing a background. The catch is that no single method covers everything. A hard-edged product shot asks for one approach. A portrait with flyaway hair asks for another. A transparent glass object asks for a third.
This guide walks through all 10 methods in Photoshop 2026 (Desktop v27), ordered from fastest to most precise. For each one you get the exact menu path, a keyboard shortcut, and a tip pulled from our own experience running high-volume image batches. There is also a troubleshooting section for the five problems our editors run into most, plus a full rundown of the Generative AI features Adobe rolled out across 2024 and 2025.
Before You Start: The Step Most Beginners Skip
Unlock the background layer first.
Open a file and Photoshop locks the base layer by default, labels it “Background,” and parks a little padlock next to it. Try to delete a selection on that locked layer and Photoshop pops up a Fill dialog instead of deleting. That is not a bug. It is Photoshop stopping you from wiping out data by accident.
To unlock it: Double-click the Background layer in the Layers panel, then click OK in the dialog. The layer becomes “Layer 0,” the padlock vanishes, and Delete now removes pixels the way you expect.
A tip from our editors: For client work we never delete pixels at all, because we want to be able to revise later. After unlocking, add a Layer Mask instead. It hides the background without touching the underlying data, so you can come back and refine the cutout without starting over.
Quick-Pick Guide: Which Method for Which Image?
The best method to delete a background in Photoshop depends on your subject: use one-click Remove Background for speed, the Pen Tool for hard-edged products, and Channel masking for hair.
| Image type | Best method | Skill level | Time |
|---|---|---|---|
| Any image, quick first pass | Remove Background (Quick Action) | Beginner | 5 sec |
| Person, pet, or product on any background | Object Selection + Select Subject | Beginner | 30 sec |
| Simple subject, solid/contrasting background | Quick Selection Tool | Beginner | 1-3 min |
| Solid white or single-colour background | Magic Wand Tool | Beginner | 1-2 min |
| Hair, fur, fine detail, semi-transparent edges | Select and Mask workspace | Intermediate | 5-15 min |
| Hard-edged product, architecture, vehicle | Pen Tool | Intermediate | 10-30 min |
| Uniform colour or gradient background | Color Range Selection | Intermediate | 2-5 min |
| Any – when you need to refine later | Layer Masks | Intermediate | Ongoing |
| Detailed edges with mixed colours | Background Eraser Tool | Intermediate | 5-10 min |
| Ultra-fine hair, lace, or translucent fabric | Channel-based masking | Advanced | 15-45 min |
Method 1: Remove Background, One-Click AI (Fastest)
Best for: Any image where speed matters and the subject stands out reasonably well from its background. A solid starting point for most jobs.
Keyboard shortcut: None. Accessed via the Properties panel or Discover panel
Skill level: Under 10 seconds
Speed: Beginner
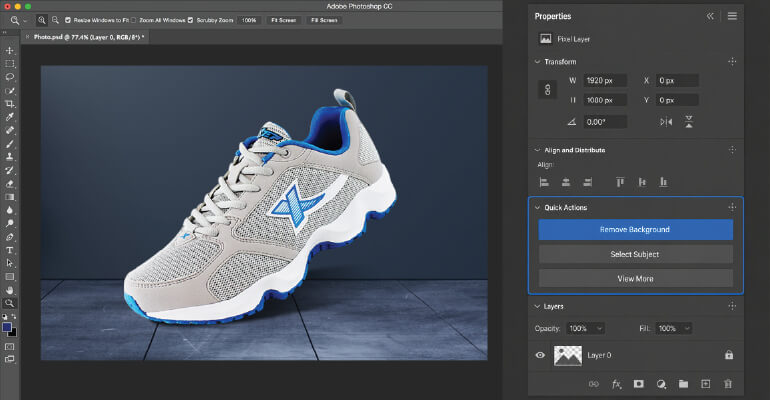
Adobe’s AI Remove Background runs Adobe Sensei to find the subject, build a selection, apply a Layer Mask, and clear the background, all from one click.
Step by step
- Open your image. In the Layers panel, double-click the Background layer to unlock it.
- With the layer selected, open the Properties panel (Window > Properties).
- Scroll to the Quick Actions section and click Remove Background.
- Or search for “Remove Background” in the Discover panel (Help > Photoshop Help).
- Photoshop builds a Layer Mask around your subject and the background drops out to a transparent checkerboard.
- To refine, click the mask thumbnail and paint black to hide areas, white to bring them back.
Pro tip: If the result is close but not quite there, click “Select and Mask” in the Properties panel while the mask thumbnail is selected. You can tighten the edges without redoing anything.
Where it falls short: It needs decent contrast between subject and background. Busy or cluttered backgrounds, or a subject that blends into the scene tonally, will give you a rough mask that needs cleanup.
Method 2: Object Selection Tool and Select Subject (Best All-Rounder for People and Products)
Best for: Portraits, pets, people in busy scenes, and product photography on any background. This is where we usually start in Photoshop 2025-2026.
Keyboard shortcut: W (cycles to Object Selection Tool)
Skill level: Beginner
Speed: 30 seconds to 2 minutes
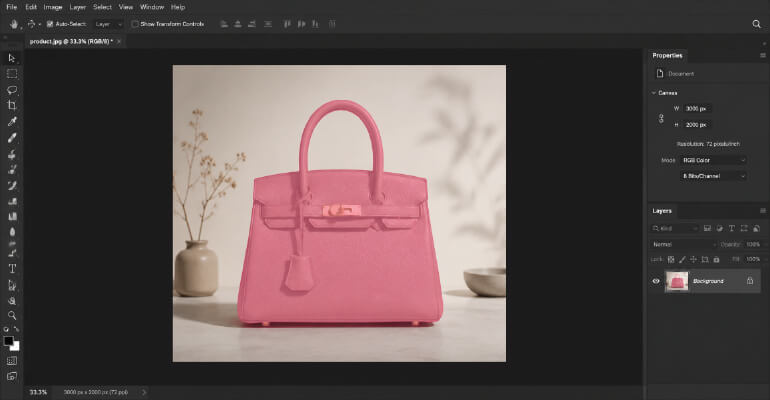
The Object Selection Tool in Photoshop 2025-2026 has an Object Finder mode. Hover over anything in the image and Photoshop highlights it with a pink overlay. One click selects it cleanly. For most images, and especially portraits, this is the most natural place to begin.
How to use Object Selection
- Press W to grab the Object Selection Tool (press W again to cycle to Quick Selection).
- In the Options bar, switch on Object Finder.
- Hover over your subject and Photoshop highlights it in pink automatically.
- Click once to make the selection. Marching ants appear around the subject.
- To add to the selection, hold Shift and click. To subtract, hold Alt/Option and click.
- Go to Select > Inverse (
Shift+Ctrl/Cmd+I) to select the background instead. - Press Delete to remove it, or click Add Layer Mask for a non-destructive cutout.
Using Select Subject directly
For a one-click selection from the menu, go to Select > Subject. Photoshop reads the whole image and selects the most prominent subject for you, no clicking required. On portraits and product shots over clean backgrounds, this is often the quickest route.
Pro tip: After Select Subject runs, open Select and Mask to check the edge quality before you commit, especially around hair or soft fabric.
Method 3: Quick Selection Tool
Best for: Subjects with clear contrast from the background, such as product shots, objects on plain backdrops, and high-contrast images.
Keyboard shortcut: W
Skill level: Beginner
Speed: 1-3 minutes
The Quick Selection Tool uses Adobe Sensei to find edges as you paint. Drag across your subject and the selection grows to follow the edges it detects.
Step by step
- Press W and pick the Quick Selection Tool from the toolbar (cycle with W if you land on Object Selection).
- In the Options bar, click Add to Selection (the + icon) and set the brush size with [ and ].
- Click and drag across your subject. The selection expands to the detected edges on its own.
- To pull back over-selected areas, hold Alt/Option and paint over them.
- Click Select and Mask in the Options bar to refine the edges.
- Invert the selection (
Shift+Ctrl/Cmd+I) and delete or mask the background.
Pro tip: Shrink the brush ([ key) when you work near edges, and zoom to 100% for the parts that matter.
Method 4: Magic Wand Tool
Best for: Solid, even backgrounds such as white studio backdrops, flat-colour scanned artwork, and single-colour gradients.
Keyboard shortcut: W (cycle to Magic Wand from Quick Selection)
Skill level: 1-2 minutes
Speed: Beginner
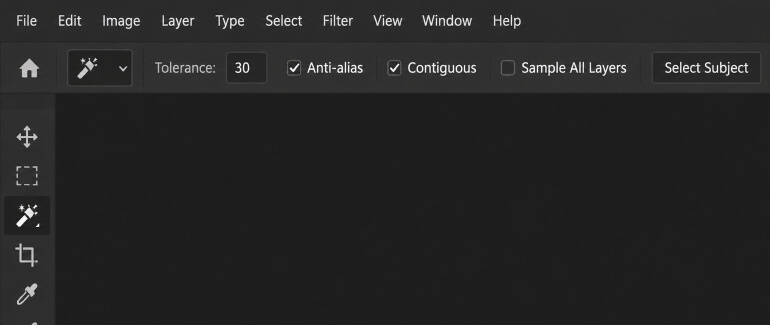
The Magic Wand selects areas of similar colour with one click. The Tolerance setting (0-255) decides how wide that colour range is. A low number catches a narrow range, a high number catches a broad one.
Step by step
- Press W and cycle to the Magic Wand Tool.
- In the Options bar, set Tolerance to 30 to start. Check Anti-alias and Contiguous.
- Click once on the background you want gone.
- If the selection is too small, raise Tolerance and try again. If it bleeds into your subject, lower it.
- Hold Shift and click other background areas to add them.
- Go to Select > Modify > Expand by 1-2 pixels to close any fringe along the edge.
- Delete or add a Layer Mask.
Heads up: Pressing Delete on a locked Background layer brings up a Fill dialog rather than deleting. If that happens, press Escape, double-click the layer to unlock it, and try again.
Where it falls short: The Magic Wand struggles with complex or gradient backgrounds, and with subjects that share colours with the background, like a blue shirt against a blue-ish wall. Reach for Color Range or Select and Mask in those cases.
Method 5: Select and Mask Workspace (Best for Hair, Fur, and Fine Detail)
Best for: Portraits with flyaway hair, animal fur, fine fabric edges, and semi-transparent objects like glass or lace.
Keyboard shortcut: Activate any selection tool, then click the Select and Mask button in the Options bar
Skill level: Intermediate
Speed: 5-15 minutes
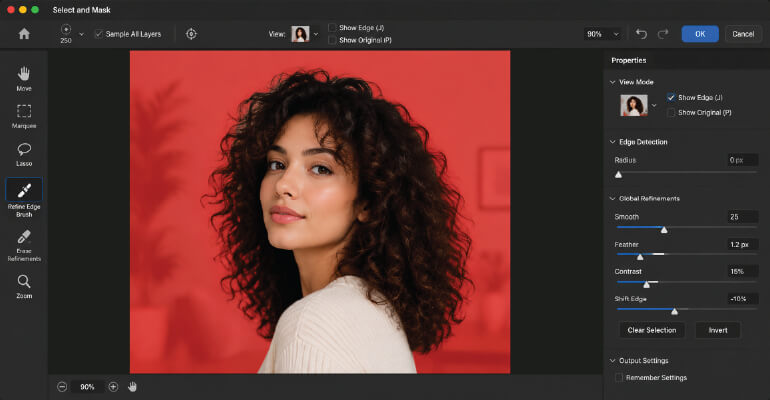
Select and Mask is the strongest edge-refinement environment in Photoshop. It is not a selection method on its own. You rough out a selection with any tool, then open Select and Mask to clean it up.
Step by step
- Make an initial selection with Quick Selection, Object Selection, or Select Subject.
- With the selection active, go to Select > Select and Mask (or press
Alt/Option+Ctrl/Cmd+R). - Set the View mode to “On Black” or “On White” so you can read the edge quality clearly.
- Pick the Refine Edge Brush Tool (second tool in the left toolbar, shortcut R).
- Paint over hair, fur, or soft edges. Photoshop studies the fine detail and adjusts the mask.
Adjust the sliders as needed:
- Smooth: Knocks back jagged edges. Go easy, too much erases fine detail.
- Feather: Softens the edge. Usually 0.5-1px is plenty.
- Contrast: Sharpens soft edges, handy for fabric and hair against a blurred background.
- Shift Edge: Pushes the boundary out (positive) or in (negative). Negative values trim edge fringe.
At the bottom, turn on Decontaminate Colors. This pulls out the colour halo that bleeds from the old background into the edge pixels. Set it to 50-70%.
Set Output to New Layer with Layer Mask and click OK.
Pro tip: When we edit large batches of fashion product images, Decontaminate Colors does more for edge quality than anything else, particularly when the background is strongly coloured. Always check it before you finish.
Losing hours to hair and fine edges? See how our team clears them at scale.
See How We Do It »Method 6: Pen Tool (Pixel-Perfect Precision)
Best for: Product photography with hard, geometric edges, like electronics, packaging, shoes, watches, and architectural elements. Any image where you need absolute precision and the accuracy is worth the time.
Keyboard shortcut: P
Skill level: Intermediate
Speed: 10-30 minutes, depending on the subject
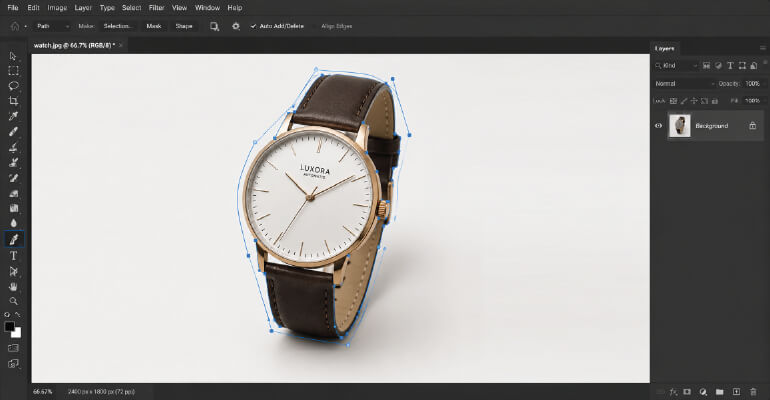
The Pen Tool draws vector paths with mathematically precise curves and straight lines, which gives you full control over the boundary. It is slower than the AI tools, but it produces the cleanest cutouts in Photoshop. That is why high-end product retouchers lean on it almost exclusively.
Step by step
- Press P for the Pen Tool. In the Options bar, confirm it is set to Path mode, not Shape.
- Click the edge of your subject to drop the first anchor point.
- For curves, click and drag to pull bezier handles that steer the curve. For straight edges, just click without dragging.
- Keep clicking around the subject, following the edge. Hold Alt/Option and click an anchor to drop the second handle before a straight segment.
- To close the path, click the first anchor point. A small circle appears next to the cursor.
- Open the Paths panel (Window > Paths). Click the three-line menu and choose New Path, then name it, so the path is saved if you need it later.
- Right-click the path in the Paths panel and choose Make Selection. Set Feather Radius to 0.5px for smooth edges.
- The path becomes marching ants. Invert (
Shift+Ctrl/Cmd+I) and delete or mask.
Pro tip: Press Ctrl/Cmd+Z to undo the last anchor. To adjust an existing one, switch to the Direct Selection Tool (A) and click it. Use Ctrl/Cmd+H to hide the path while you check the edge.
Method 7: Color Range Selection
Best for: Backgrounds in a single, even colour, such as white, solid grey, or gradient studio backdrops. Also good for pulling one specific colour out of a busier scene.
Keyboard shortcut: None – accessed via Select > Color Range
Skill level: Intermediat
Speed: 2-5 minutes
Step by step
- Go to Select > Color Range.
- In the dialog, make sure the Add to Sample eyedropper is active, then click the background colour in the preview or canvas.
- Drag the Fuzziness slider. Low values catch only close matches, high values catch a wider range. Watch the black-and-white preview: white areas are selected, black areas are not.
- Hold Shift and click other background tones to add them.
- Click OK. Marching ants mark the selection.
- Go to Select > Modify > Expand by 1-2px to clear fringe pixels at the subject edge.
- Delete or add a Layer Mask.
Pro tip: For white backgrounds, set Fuzziness around 120 and click the white area, which grabs most white tones at once. Then add a Layer Mask and paint back any white parts of the subject itself, like labels, light fabric, or teeth in portraits.
Method 8: Layer Masks (Non-Destructive Editing)
Best for: Any project where you might revise the cutout later, or any work you do back and forth with a client.
Keyboard shortcut: After selecting the background, click the Add Layer Mask icon in the Layers panel
Skill level: Intermediate
Speed: Ongoing
Layer Masks are the professional standard for non-destructive removal. Instead of deleting pixels, a mask hides them with a black-and-white map. Black hides the matching area of the image, white reveals it, and no image data is ever lost.
Step by step
- Make your selection using any method above.
- In the Layers panel, click the Add Layer Mask button (the rectangle with a circle) at the bottom.
- A mask thumbnail appears next to the layer thumbnail. The background is hidden now, not deleted.
- To refine, click the mask thumbnail to make it active, grab the Brush Tool (B), then paint black to hide more or white to bring areas back.
- Adjust brush Opacity in the Options bar for softer transitions, for example a 30% brush for feathered edges.
- <
Ctrl/Cmd+Ion the mask inverts it, which fixes the case where you selected the subject instead of the background.
Why we always mask for client work: If a client asks for a change three months later, the original pixels are still there. We revise the cutout in minutes instead of rebuilding it.
Method 9: Background Eraser Tool
Best for: Images where the subject and background contrast clearly but the background is busy, with mixed colours, natural scenes, or texture.
Keyboard shortcut: E, then Shift+E to cycle to Background Eraser
Skill level: Intermediate
Speed: 5-10 minutes
The Background Eraser samples the colour under the crosshair at the centre of the brush, then erases only the pixels within the Tolerance range of that colour. So you can erase right up to the edge of a subject without touching the subject itself.
Step by step
- Unlock the background layer. Press E then Shift+E to cycle to the Background Eraser Tool.
- In the Options bar, set Sampling to Continuous (re-samples as you drag) or Once (samples on first click, good for even backgrounds). Set Limits to Find Edges.
- Set Tolerance: 20-30% when the background is clearly different from the subject, lower when they are close in tone at the edge.
- Paint over the background, keeping the crosshair on background pixels while the brush edge reaches into the subject.
- Zoom to 200-300% for edges near the subject.
Pro tip: If the eraser starts eating into your subject, lower the Tolerance. If it leaves background pixels behind, raise it. The sweet spot is different for every image.
Method 10: Channel-Based Masking (Advanced, Best for Hair and Fine Detail)
Best for: Hair, fur, flyaway strands, lace, and translucent fabric. Any subject where fine, semi-transparent detail has to survive against the background. This is the most accurate technique for those subjects.
Keyboard shortcut: Window > Channels to open the Channels panel
Skill level: Advanced
Speed: 15-45 minutes
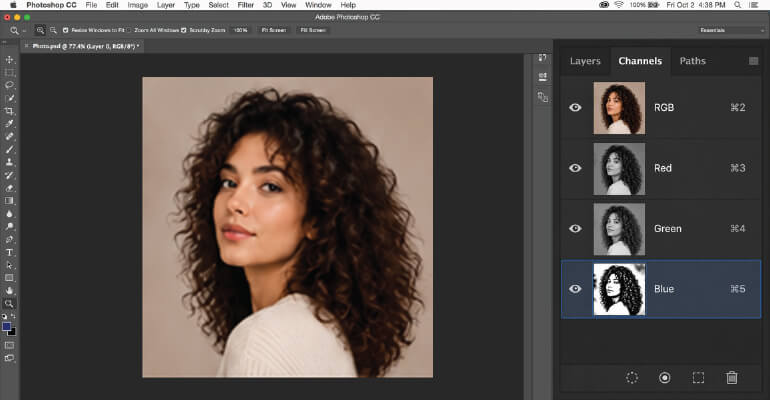
Channel masking pulls a selection from the luminosity in the image’s colour channels rather than from colour proximity. Hair strands that match a background tone, the kind the Magic Wand or even Select and Mask cannot grab, often come out clean with this technique.
Step by step
- Open the Channels panel (Window > Channels).
- Click through the Red, Green, and Blue channels to find the one with the most contrast between subject and background. For portraits this is usually the Blue channel.
- Right-click the highest-contrast channel and choose Duplicate Channel. Name it “Mask.”
- With the Mask channel selected, go to Image > Adjustments > Levels (
Ctrl/Cmd+L). Drag the black input slider right and the white slider left until the background goes pure white and the subject goes pure black. Click OK. - Use a hard-edged white brush at 100% opacity to fill in the subject body so it is fully black. Use a black brush to clean up any grey left in the background.
- Ctrl/Cmd-click the Mask channel thumbnail to load it as a selection. White areas become selected.
- Go to Select > Inverse (
Shift+Ctrl/Cmd+I) so the subject is selected. - Back in the Layers panel (click the RGB channel first), add a Layer Mask with the subject selected. The background drops out and the individual hair strands stay
Pro tip: After the mask is done, zoom to 200-400% and look closely at the hairline. A small amount of Decontaminate Colors, applied to the Layer Mask through Select and Mask, clears any leftover background-colour halo around the finest strands.
New in 2026: Generative AI Background Tools
Photoshop first added AI generation in v25 (2023) and expanded it heavily in v26-v27 (2024-2026). Three features now go past removal into background replacement and object removal. They run on Adobe Firefly Image 3 and live inside Creative Cloud.
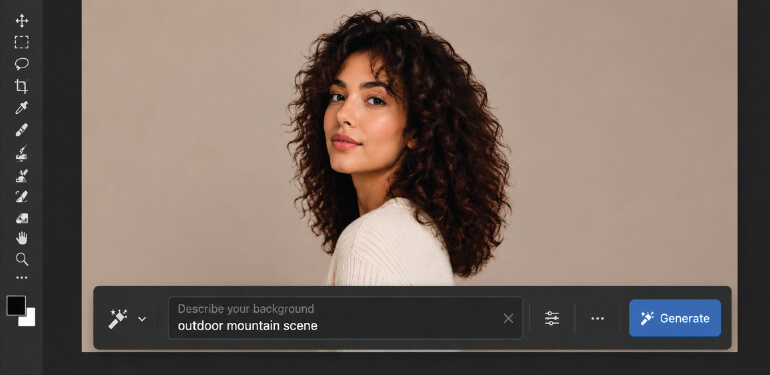
Generative Fill: replace a background with AI
Once the background is removed with any method above, you can drop in an AI-generated scene from a text prompt:
Ctrl/Cmd-clickthe Layer Mask to load the background area as a selection.- The Contextual Task Bar appears at the bottom of the canvas. Click Generative Fill.
- Type the background you want, such as “clean white studio,” “outdoor Japanese garden,” or “blurred bokeh city street.”
- Click Generate. Adobe Firefly Image 3 returns three variations. Pick the best.
- Each variation is non-destructive and sits on its own Generative Layer, so you can switch between them whenever.
On generative credits: Generative Fill spends generative credits from your Creative Cloud plan. The basic Remove Background action and the Remove Tool do not use credits. You can check your balance under the Account menu in Photoshop.
Generate Background (beta)
New in Photoshop 2026, Generate Background builds a fresh background that matches your subject’s lighting direction, colour temperature, and perspective, with no text prompt needed. You reach it from the Properties panel after removing the background.
Remove Distractions (Remove Tool, added October 2024, Photoshop v26)
The Remove Tool now has a Find Distractions mode that detects and removes either people or cables and wires automatically. Set Mode to Auto, Generative AI On, or Generative AI Off in the Options bar. It earns its keep in real estate work, where you often need to clear power lines or stray people out of an exterior shot.
Master Comparison: All 10 Methods
For most photos the one-click Remove Background is enough; for hair and fur, Channel masking and Select and Mask give the cleanest cutouts; for product edges, the Pen Tool wins on precision.
| Method | Best for | Skill | Typical time | Handles hair? | Non-destructive by default? |
|---|---|---|---|---|---|
| Remove Background (Quick Action) | Any image, fast draft | Beginner | 5 sec | Partially | Yes (Layer Mask) |
| Object Selection / Select Subject | People, pets, products | Beginner | 30 sec | Partially | No – use mask |
| Quick Selection Tool | Contrasting subjects | Beginner | 1-3 min | No | No – use mask |
| Magic Wand | Solid-colour bg | Beginner | 1-2 min | No | No – use mask |
| Select and Mask | Hair, fur, soft edges | Intermediate | 5-15 min | Yes | Yes |
| Pen Tool | Hard-edged products | Intermediate | 10-30 min | No | No – use mask |
| Color Range | Uniform colour bg | Intermediate | 2-5 min | No | No – use mask |
| Layer Masks | Iterative editing | Intermediate | Ongoing | Depends on selection | Yes |
| Background Eraser | Mixed colour bg | Intermediate | 5-10 min | No | No (destructive) |
| Channel masking | Ultra-fine hair/fur | Advanced | 15-45 min | Yes (best) | Yes |
Keyboard Shortcuts Cheat Sheet
| Action | Windows | Mac |
|---|---|---|
| Quick Selection / Object Selection Tool | W | W |
| Cycle between Object Select and Quick Select | W again | W again |
| Pen Tool | P | P |
| Eraser Tool | E | E |
| Cycle to Background Eraser | Shift+E | Shift+E |
| Brush Tool (for mask painting) | B | B |
| Increase brush size | ] | ] |
| Decrease brush size | [ | [ |
| Undo last action | Ctrl+Z | Cmd+Z |
| Multiple undos (History) | Ctrl+Alt+Z | Cmd+Option+Z |
| Deselect all | Ctrl+D | Cmd+D |
| Inverse selection | Shift+Ctrl+I | Shift+Cmd+I |
| Open Select and Mask | Alt+Ctrl+R | Option+Cmd+R |
| Open Levels adjustment | Ctrl+L | Cmd+L |
| Add to selection | Shift+click | Shift+click |
| Subtract from selection | Alt+click | Option+click |
Troubleshooting: 5 Common Problems and How to Fix Them
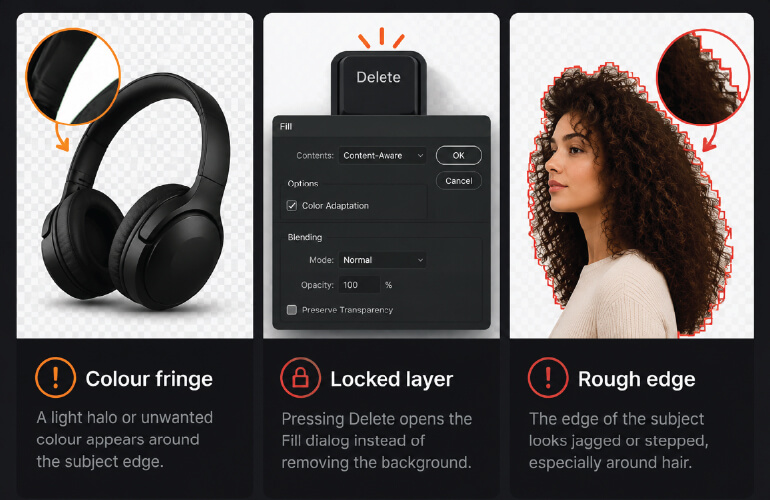
Problem 1: Pressing Delete opens a Fill dialog instead of erasing
Cause: The Background layer is locked.
Fix: Double-click the Background layer in the Layers panel to unlock it, then try again. You can also right-click the layer and choose “Layer from Background.”
Problem 2: The Background Eraser is deleting part of the subject
Cause: Tolerance is set too high, or the subject and background share similar colours.
Fix: Drop Tolerance to 15-20%. Switch Sampling to “Once” and click a clearly background-coloured pixel. For subjects that overlap the background in colour, use Select and Mask or the Pen Tool.
Problem 3: A white or coloured halo around the cutout
Cause: Edge pixels from the original background are still there, and they show up once the subject lands on a new background.
Fix1: In Select and Mask, turn on Decontaminate Colors at 50-70% before you output the mask.
Fix2: After masking, go to Layer > Matting > Defringe and set it to 1px
Fix3: With the Layer Mask active, go to Filter > Other > Minimum at 1px to shrink the mask edge slightly.
Problem 4: Hair or fur looks jagged or stepped
Cause: A pixel-level method (Quick Selection, Magic Wand) was used without edge refinement.
Fix: Open Select and Mask with the mask thumbnail selected. Run the Refine Edge Brush over the hair and turn on Decontaminate Colors. For very fine hair against busy backgrounds, switch to Channel masking (Method 10).
Problem 5: AI Remove Background keeps cutting off part of the subject
Cause: Adobe Sensei could not confidently tell the subject from the background. This happens when the two match in tone or colour, or when the subject is unusual enough that the AI has seen fewer examples of it.
Fix: Use the Object Selection Tool to draw a rough marquee around the subject by hand. Photoshop uses that hint to sharpen its detection. Then refine with Select and Mask.
How to Save a Transparent Background Correctly
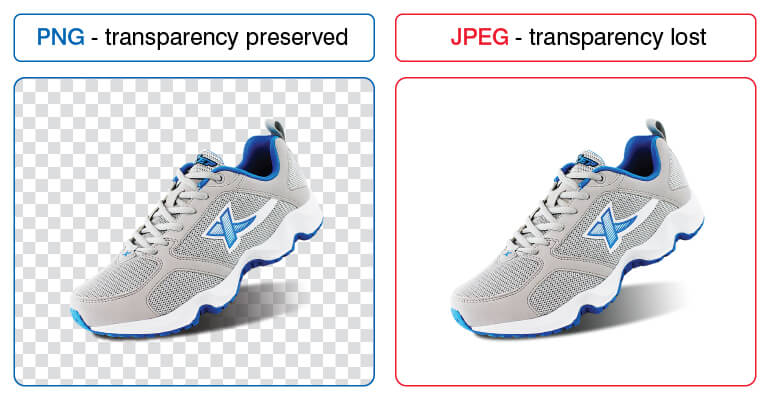
Save in the wrong format after all that work and you lose the transparency. Here is the rundown.
Save as PNG (keeps transparency):
- Go to File > Export > Export As (or
Alt/Option+Shift+Ctrl/Cmd+W). - Set Format to PNG. Confirm the preview shows a transparent checkerboard background.
- Click Export All and pick your save location.
Why not JPEG? JPEG has no alpha channel, so it cannot store transparency. Save a transparent image as JPEG and Photoshop fills the empty areas with white (or whatever the background colour is), which wipes out the cutout. JPEG only makes sense once you have placed the subject on a specific new background.
For web: PNG-24 supports full alpha transparency and is the right choice for logos, product images, and site assets that sit on any background.
For print: Save as TIFF with transparency preserved, or as PSD. TIFF supports alpha channels and is lossless.
For high-volume batches: Photoshop’s batch processing (File > Automate > Batch) can export hundreds of images with the same settings. Record an Action for the Remove Background step plus Export As PNG, then run it across a whole folder.
Free Alternatives to Photoshop for Background Removal
Not everyone has a Creative Cloud subscription (Photoshop is $23.99/month as of June 2026, or $9.99/month on the Photography plan that bundles Lightroom). These free tools cover background removal for quick jobs:
- Adobe Express (free): A web-based Remove Background tool, good for one-off images with no install.
- Remove.bg: Upload an image and get a transparent PNG back free, with resolution limited on the free plan. There is an API for bulk work.
- Canva: A built-in background remover for photos in Canva designs, which needs a Canva Pro plan.
- GIMP: A free, open-source desktop editor with a Foreground Select Tool and manual masking. Powerful, but it takes a while to learn.
Our honest take: Free tools do fine on simple subjects over plain backgrounds. On product work with fine detail, hair, jewellery, or glass, they hand back rough masks you have to fix by hand. By the time you have done that, the subscription has already earned its money back in saved time.
Where Background Removal Gets Used
Several industries build their visual standards on background removal.
- E-commerce: Amazon, Walmart, and Shopify all want primary listing images on pure white (#FFFFFF). Removing backgrounds consistently across a catalogue keeps the look uniform, which helps buyers trust the listings and tends to lift conversion. On one HabileData project our team took more than 12,000 product images to Amazon-standard white backgrounds in a single catalogue refresh, with each image needing removal, colour correction, and a shadow.
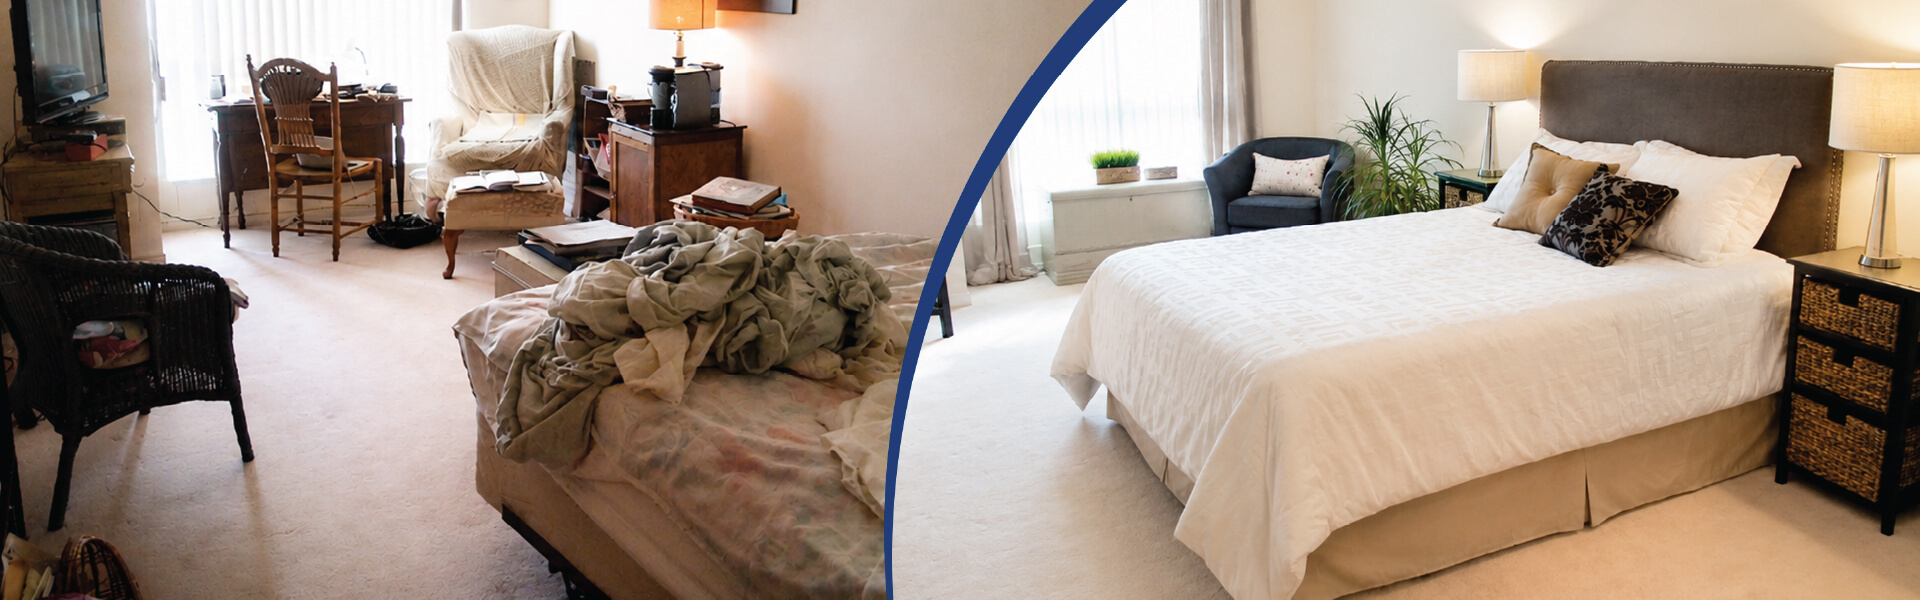
- Real estate: Editors swap grey skies for blue ones (sky replacement), clear parked cars or bins from exteriors, and isolate furniture for virtual staging. Professionally edited listing photos pull better click-through rates on Zillow and Realtor.com than unedited ones. Our real estate photo editing case study shows the difference.
- Fashion and apparel: Ghost mannequin (invisible mannequin) effects need precise garment isolation, and brands also lift models onto lifestyle or editorial backgrounds. HabileData processed 324,000 fashion images for a single retailer, delivering brand-consistent cutouts with hair-level edge precision.
- Automotive: Dealers isolate vehicles on white or gradient studio backgrounds for website galleries and digital ads. Swapping in scenic or lifestyle settings is becoming common for higher-end vehicle marketing.
- Food and beverage: Isolated food shots on white or editorial backgrounds turn up across menu design, delivery app listings (Zomato, Deliveroo, DoorDash), and packaging.
When to Outsource Background Removal
Photoshop hands you the tools. Doing the work with expertise, on time, and consistently at volume is a separate problem.
Our team suggests outsourcing when:
- You have more than 200 images a month that need consistent, production-quality cutouts.
- Your products include jewellery, glass, reflective surfaces, sheer fabric, or fine hair, where even seasoned editors take much longer per image.
- You need guaranteed turnaround for catalogue launches or seasonal campaigns.
- You want brand standards (shadow style, background hex code, padding margin) applied the same way on every image, which tends to drift when different people do it in-house.
HabileData’s background removal services and product photo editing team work to 24-48 hour turnaround, review every image, and scale up for catalogue projects. Connect with our team to talk through your volume and requirements.
Send us three images and see production-quality cutouts back within 24 hours, no commitment.
Get a Free Sample Edit »Conclusion
The right way to delete a background depends on the subject, the background, and how precise the final use has to be. For quick results on most images, the one-click Remove Background and the Object Selection Tool (Methods 1 and 2) handle the bulk of cases in under a minute. For hair, fine detail, and high-precision product work, Select and Mask and Channel masking (Methods 5 and 10) hold up at large print size and on any background.
The 2026 additions (Generative Fill, Generate Background, and Remove Distractions) let you replace a background with an AI-generated scene in seconds instead of building one by hand. They have become part of everyday editing for e-commerce, real estate, and advertising.
If your team is spending real time on image editing instead of core work, HabileData’s photo editing services cover background removal, shadow creation, and retouching at volume, with 24-48 hour turnaround. Request a sample edit to see what our team delivers before you commit to a full project.
Last verified: June 2026 (Adobe Photoshop Desktop v27, Creative Cloud). Menu paths and feature availability may differ on earlier versions. Photoshop on the web and Photoshop for iPad support a subset of the methods described here. Check Adobe’s official documentation at helpx.adobe.com/photoshop for platform-specific guidance.
Frequently Asked Questions
The fastest is the one-click AI Remove Background in the Properties panel (Quick Actions > Remove Background), which takes under 10 seconds. For cleaner results on portraits and products, use Object Selection with Object Finder: hover over the subject, click once, then add a Layer Mask. That adds about 30 seconds and gives you noticeably better edges.
Remove the background with any method here, which leaves a Layer Mask hiding it, then export as PNG (File > Export > Export As > PNGShift+Ctrl/Cmd+I ). The transparent areas show as a checkerboard in Photoshop and read as transparent on websites and in design tools. Do not save as JPEG, since JPEG fills transparency with white.
There is no single shortcut for the Remove Background Quick Action. The fastest keyboard-driven path is W (Object Selection Tool), hover, click, then Shift+Ctrl/Cmd+I to inverse and Delete. For Select and Mask, press Alt/Option+Ctrl/Cmd+R.
Use Select and Mask (Method 5) with the Refine Edge Brush and Decontaminate Colors at 50-70%. For very fine or flyaway hair against busy backgrounds, Channel-based masking (Method 10) gives the cleanest result, because it works from luminosity rather than colour proximity and keeps strands that other tools merge or clip.
Your Background layer is locked. Double-click it in the Layers panel to make it a normal layer, and then Delete erases the selected pixels. Better still, after making the selection click Add Layer Mask instead, which is non-destructive and is what professional editors use for client work.
Photoshop needs an Adobe Creative Cloud subscription. As of June 2026, Photoshop on its own is $23.99/month, and the Photography plan is $9.99/month and includes Lightroom. For free options, Adobe Express (browser-based), Remove.bg (free at low resolution), and GIMP (fully free, desktop) all handle background removal. For professional or high-volume work, Photoshop’s precision and AI tooling tend to justify the cost.
For products on white backgrounds, use Object Selection or Quick Selection to isolate the product, refine with Select and Mask, then use Color Range to clear any leftover white or light tones. For reflective surfaces like glass, chrome, or jewellery, the Pen Tool plus a manual Layer Mask is the industry standard. Export as PNG on a white layer (not transparent) so the background is a true #FFFFFF rather than an off-white from compression.
Generative Fill is an AI feature powered by Adobe Firefly Image 3 that replaces any selected area with an AI-generated scene from a text prompt. After removing the background, load the masked area as a selection (Ctrl/Cmd-click the Layer Mask thumbnail), click Generative Fill in the Contextual Task Bar, and type a description like “white studio backdrop with soft shadow.” Photoshop returns three variations. It uses generative credits, which you can check in the Account menu. The Remove Background Quick Action and the Remove Tool do not consume credits.
It works well when subject and background are clearly distinct, so product photos, portraits, and pet shots give the best results. It struggles with subjects close in colour or tone to the background, glass or transparent objects, very busy backgrounds (dense foliage, crowds), and images with several subjects. For those, use a manual selection followed by Select and Mask.
The quickest route for white is Color Range (Select > Color Range): click the white area, set Fuzziness to 100-120, click OK, then add a Layer Mask. For products on a pure white studio backdrop, the Magic Wand at Tolerance 30 with Contiguous checked is just as fast. When the product itself contains white (white labels, white fabric), select the subject first with Select Subject or Object Selection, then mask the background from that selection rather than selecting the white directly.
Need this done at scale? We remove backgrounds, add shadows, and retouch product images in 24-48 hours.
Start With a Free Sample »


Snehal Joshi , Head of Business Process Management at HabileData, leads a 500-member team of data professionals, having successfully delivered 500+ projects across B2B data aggregation, real estate, ecommerce, and manufacturing. His expertise spans data hygiene strategy, workflow automation, database management, and process optimization - making him a trusted voice on data quality and operational excellence for enterprises worldwide. 🔗Connect with Snehal on LinkedIn