Photo retouching is an umbrella discipline under which we have a group of techniques and tasks including portrait, editorial, commercial, beauty, and creative editing. Each of these work categories demands a distinct approach.
Contents
- Photo retouching vs. Photo editing: What is the difference?
- 5 types of photo retouching: Which category applies to your project?
- 14 Photo retouching techniques: Selection criteria and time benchmarks
- Top 8 factors that determine the right photo retouching technique
- Choosing the right photo editing methodology by industry
- Using AI and/or manual techniques for photo retouching
- How long does photo retouching take? Time benchmarks by technique
- Conclusion
- FAQ
Professional product photos can increase an online retailer’s conversion rate by as much as 70 percent (BigCommerce, 2023). To reach that level of success depends entirely on using correct photo retouching techniques for images and doing so at the appropriate time during the workflow.
To determine the best type of photo retouching technique for images: first categorize the image; second, determine what platform you will be outputting to; third, select a technique based on the enhancements needed for the desired output.
Below is a framework that outlines all of these steps and provides information mapping, most of the commonly used photo retouching techniques with the conditions under which they should be applied.
Photo retouching vs. Photo editing: What is the difference?
Photo editing involves making changes that are universal throughout the photos (exposure, brightness/contrast, white balance, cropping) and can be done on multiple images at once.
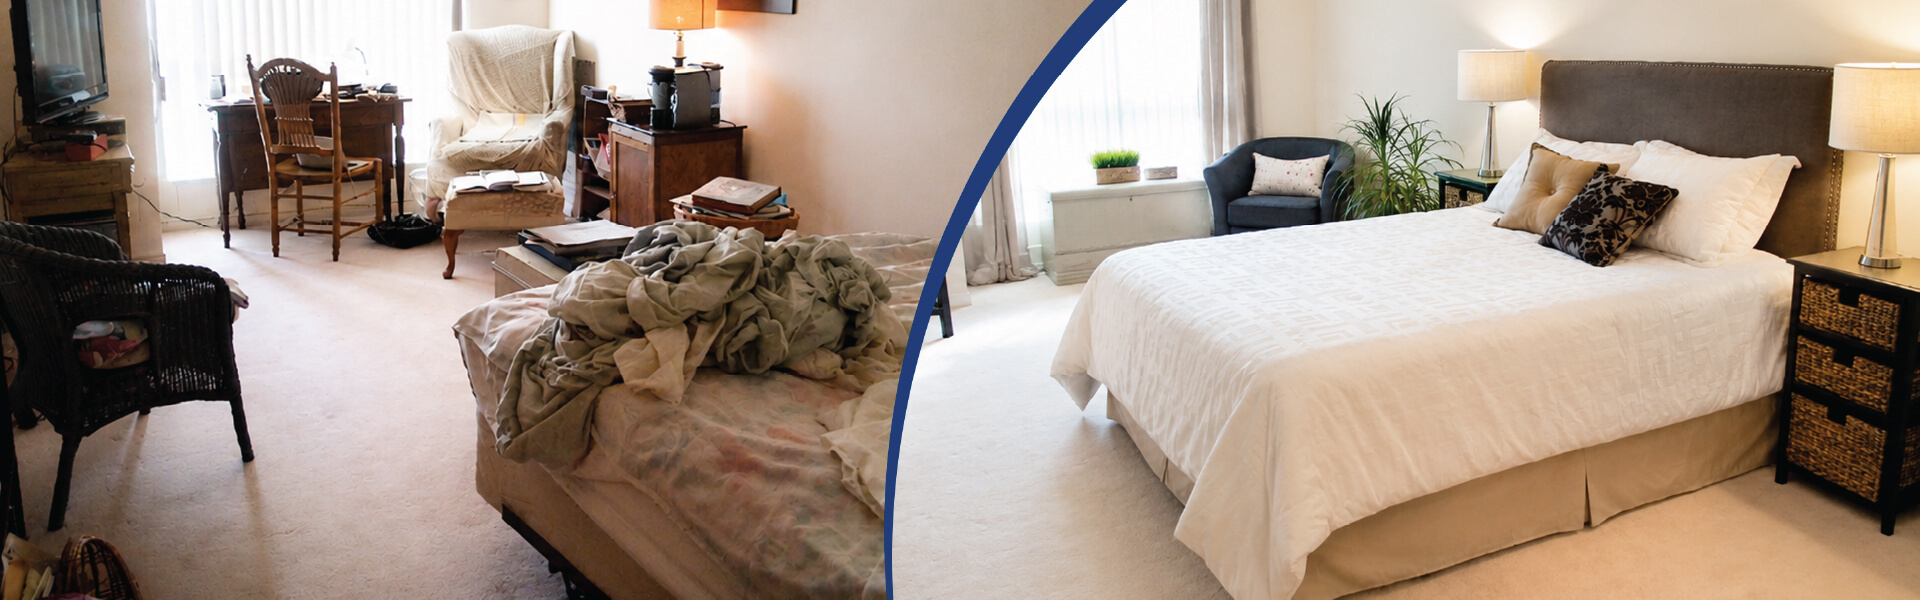
A photo retouch is specific to each photograph (blemishes removed from one face while another has blemishes left; a smooth finish added to one person’s face while leaving another with a rough texture; objects or backgrounds removed from one photo while remaining in another; color correction of a single element in a scene).
In order to determine if you need to use photo retouching techniques for your project, first it is important to find out the type of project.
| Photo Editing | Photo Retouching |
|---|---|
| Global adjustments (exposure, contrast, crop, white balance) | Targeted, image-specific enhancements (blemish removal, skin smoothing, object removal) |
| Applied to full shoot in batch | Applied per image – each decision is individual |
| Primary tool: Adobe Lightroom or Capture One | Primary tool: Adobe Photoshop |
| Output: consistent baseline across all images | Output: precise correction for a defined aesthetic goal |
5 types of photo retouching: Which category applies to your project?
Every photo retouching category comes with a specific scope. Choosing the right photo retouching method at the beginning stage will guide you through most of the rest of the technical decision-making process.
- Portrait retouching: It’s not lack of skills that causes portrait retouching to go awry. Well, it is over-use of skill. Blending heavy amounts of low frequency (the detail that makes up texture) results in a loss of skin texture, and an unnatural “plastic” finish which reduces an image’s overall credibility almost instantly.
- Editorial retouching: Editorial retouching fails when treated as a collection of images rather than a system. If color and tone decisions are not made on the same day as the shoot, the images will have a disjointed look when displayed in print or digital layouts.
- Commercial retouching: This is where aesthetics meet accountability. If the color calibration does not align with the output device(s) and platform(s), you’ll be getting a poor-quality image, product returns and damaged consumer trust.
- Beauty retouching: The benchmark for beauty retouching shouldn’t be perfection – it should be alignment with the brief. There should be significantly less photo retouching required for a natural skincare brand than a luxury cosmetic brand. Using the wrong standard can be seen as a strategic misstep.
- Creative and composite retouching: Most problems are inherent within the inputs. If there is no consistency with regard to perspective, lighting direction, and/or color temperature within the input images, it will be very difficult to make corrections after composite.
| Retouching Type | What It Covers | Primary Techniques | Best Use Cases |
|---|---|---|---|
| Portrait Retouching | Skin tone correction, blemish removal, teeth whitening, eye and hair enhancement | Frequency separation, dodge & burn, skin smoothing | Headshots, weddings, family photography, personal branding |
| Editorial Retouching | Color grading, tonal balance, texture consistency across image sets | Color grading, tonal curves, texture enhancement | Fashion editorials, lookbooks, print campaigns, brand identity |
| Commercial Retouching | Product enhancement, background cleanup, color accuracy, shadow/reflection creation | Clipping path, compositing, color correction (sRGB), shadow creation | eCommerce listings, catalogues, ads, POS materials |
| Beauty Retouching | Skin, hair, and makeup refinement toward aesthetic standards | Frequency separation, dodge & burn, liquify, hair masking | Cosmetics, skincare campaigns, model portfolios |
| Creative & Composite | Multi-image manipulation, visual effects, scene transformation | Compositing, sky replacement, lighting effects, perspective matching | Advertising concepts, album art, conceptual/editorial campaigns |
Want to understand different photo retouching techniques and categories?
Contact our photo editors »14 Photo retouching techniques: Selection criteria and time benchmarks
Below are guidelines for selecting the photo editing techniques; also included are the required skill levels (based on the skills used by professional editors) and time ranges for each technique (per image).
The “Select when…” columns describe the conditions under which to select a particular technique – they do not serve as descriptions of how those techniques function. Here are the common photo retouching techniques explained.
| Technique | Select when… | Skill · Time/image |
|---|---|---|
| Frequency Separation | Portrait skin has uneven tone; texture must be preserved | Intermediate · 20–45 min |
| Dodge and Burn | Subject needs dimensional depth; highlights and shadows are flat | Intermediate · 15–40 min |
| Color Grading | Image requires consistent mood or visual style across a set | Beginner–Int · 5–20 min |
| Composite Editing | Final image combines two or more source files | Advanced · 1–6 hrs |
| Exposure Adjustment | RAW file is over- or underexposed; tonal range needs correction | Beginner · 2–8 min |
| Skin Smoothing | Portrait requires polished finish; texture retention is secondary | Beginner–Int · 10–25 min |
| Sharpening | Output is web or print; fine edge detail must be enhanced post-resize | Beginner · 2–5 min |
| Liquify | Subject shape or product form requires subtle geometric correction | Intermediate · 10–30 min |
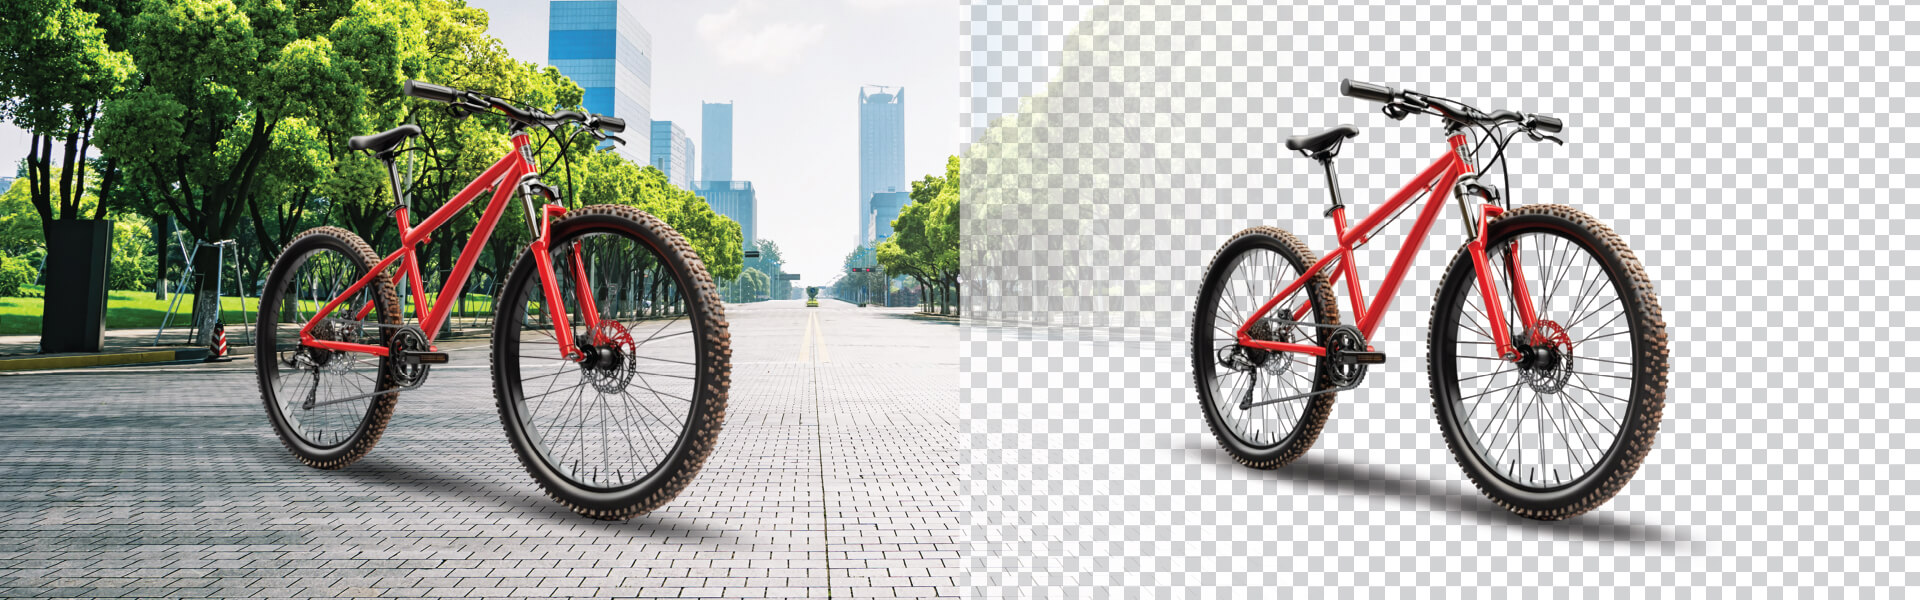
| Clipping Path | Product must be isolated for white background or compositing | Intermediate · 5–20 min |
| Noise Reduction | Source file shot at ISO ≥3200 or in low-light conditions | Beginner · 3–10 min |
| Vignette | Composition needs edge-to-centre focus draw | Beginner · 2–5 min |
| Color Correction | Product or skin tones are inaccurate across the image set | Beginner–Int · 5–15 min |
| Perspective Correction | Architectural or product lines distorted by lens angle | Beginner · 3–10 min |
| Object Removal | Frame contains unwanted elements that distract from the subject | Intermediate · 10–30 min |
Top 8 factors that determine the right photo retouching technique
Here are the factors experts consider in photo retouching to decide which method of editing they will use. When Habile Data’s photo editing team begins an edit project, they follow an 8-step framework to eliminate the guessing and ensure that all editors choose methods of editing in a similar manner, no matter how many images are involved in the project.
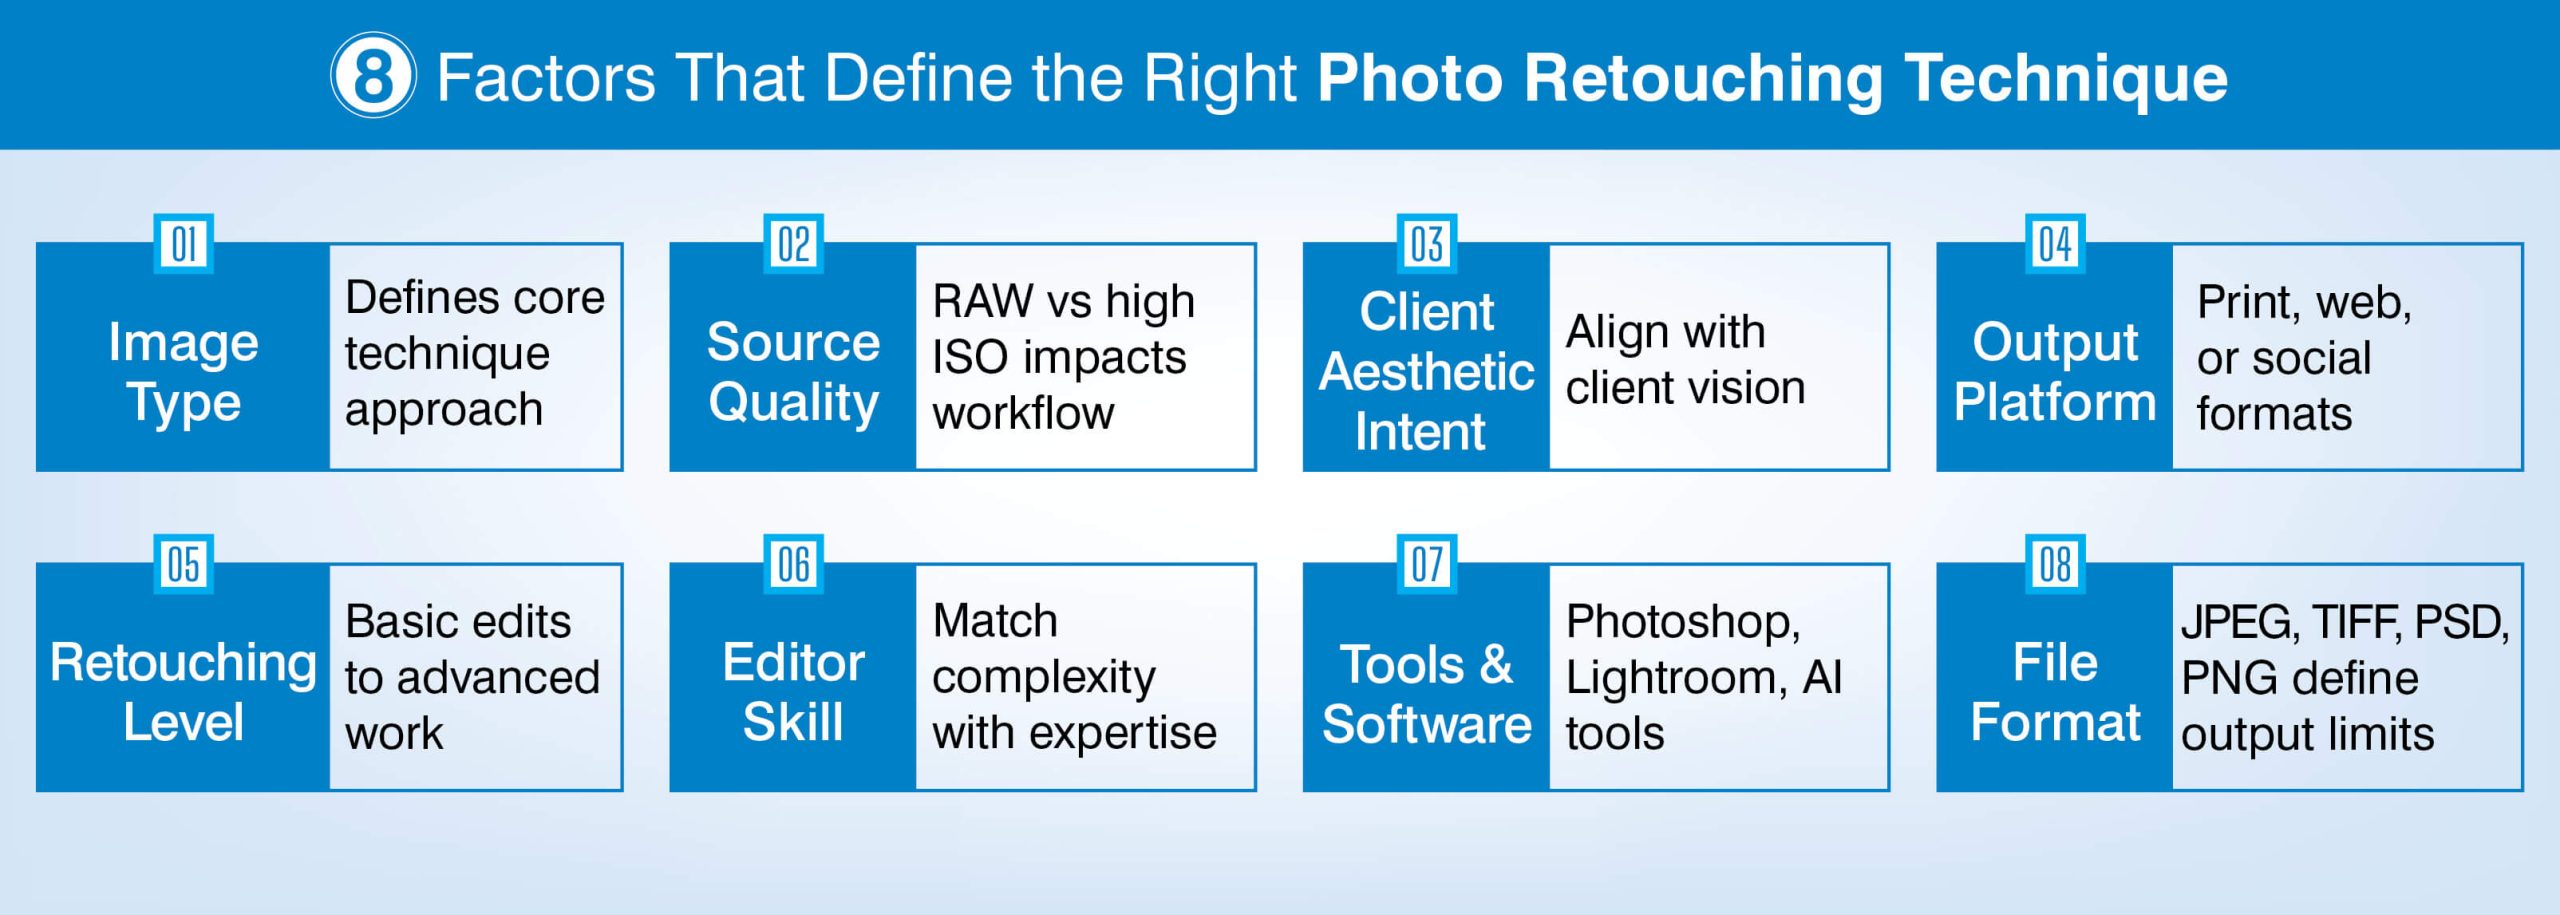
- Type of image: If you are doing portraits, you need skin focused techniques. If you are working on product photography, then you will want to use Isolation and Color Matching Techniques. Each type of image reduces the number of applicable techniques that will be evaluated prior to the actual editing process.
- Source file quality: If your source file is high resolution RAW (with good lighting) then you can use most of your techniques. However, high ISO files (3200 or greater) require noise reduction as the first step in the editing process.
Using skin retouching before reducing the noise in an image will degrade the final results. Also, use the camera’s raw function in Photoshop to apply noise reduction before starting any layer-based editing.
- Client aesthetic intent: The client aesthetic intent variable is what limits technique category sets based upon how they intend for their images to look. It must be confirmed at project intake rather than simply inferring it from the images provided.
- Output platform: Images can be printed (CMYK/300 DPI), delivered online (sRGB/72 DPI), or posted on Social Media (Compressed/Platform specific). Once the desired output platform has been determined, it cannot be changed technically.
- Level of retouching required: Some clients will only require minor edits (Color Correction & Spot Removal); while others will require extensive edits (Frequency Separation & Compositing). Scope of work needs to be clearly established so that there are no issues related to timelines.
- Editor skill level: Frequency separation, dodge/burn & compositing requires intermediate to advanced photoshop skills. As such, assigning advanced technique work to a beginner level editor increases both delivery time & reduces overall consistency.
- Software & toolset: Selective retouching in Photoshop is standard; however global adjustments & color grading at the set level are best done in either Lightroom or Capture One.
Artificial intelligence tools (Photoshop generative fill, Lightroom AI masking etc.) Allow editors to complete repeatable tasks faster.
- Output file format: Images intended for web/ecommerce usage will typically be saved as jpeg’s; images intended for printing/preservation purposes will typically be saved as TIFFs or PSDs; PNG Files are used when Transparency is required.
Ultimately, the Output file format dictates whether multi-layer compositing workflows are feasible under the project specifications.
Choosing the right photo editing methodology by industry
The five editing method types make up the full scope of methodology. When narrowing down which type will be used in a particular project through industry context, there are additional limitations placed upon that method type.
Those limits include; platform restrictions, regulatory compliance, and customer expectations for the project – all of these can take precedence over visual aesthetics.
eCommerce photo editing
Before you even begin making aesthetic decisions about your eCommerce photos, you’ll have already been constrained technically from doing so by your chosen eCommerce platform. All eCommerce platforms have some form of non-optional technical specifications that dictate what your choice of edit should be.
On Amazon, specifically, all product images must contain a pure white background (RGB 255,255,255). As such, Amazon requires the use of clipping paths, along with creating shadows or reflections. Amazon does not allow for the use of background blur or vignettes.
Most commonly used methods
- Clipping path
- Color correction (calibration of colors in accordance with sRGB)
- Background cleanup
- Ghost mannequin (for clothing)
- Shadow & reflection creation (Product image retouching for products that are packaged).
Color calibration is very important. Edited image needs to be color calibrated for sRGB and compared against the actual color of the product being photographed. Additionally, the technical constraints provided by each eCommerce platform will determine the required file formats and dimensions prior to applying style options.
For example: Amazon (jpeg format; min. 1000px on the longest side), Shopify (max. 20mb, ratio: 1:1 or 3:4), Etsy (max. 10 images per listing, recommended dimension: 2000px).
Retail real estate photo editing
In addition to aesthetic considerations that exist in virtually all photography projects, real estate photo editing is subject to a unique constraint relative to most others: the final photograph(s) must represent the property as accurately as possible. Any photographs that are overly altered and therefore misrepresent the property may put the client at risk of lawsuits as well as damage their reputation.
Commonly used methods:
- Sky replacement
- Tone mapping to blend the interior exposure
- Vertical line/ perspective corrections (lenses used to capture interiors often produce lens distortions)
- Virtual staging preparation
MLS & REA provide guidance regarding acceptable alterations/enhancements. Specifically, Sky replacements and virtual staging are considered allowable “enhancements.”
However, structural changes to properties such as removing power lines or adding/removing rooms or otherwise altering a viewer’s perception of a property’s size are strictly prohibited. Each photographer must adhere to these distinctions when reviewing/editing each image regardless if the original request clearly stated the intent.
Beauty/Fashion photo editing
With Fashion/beauty photo editing having the greatest number of techniques available and a high potential for over-editing, frequency separation is the minimum requirement for any skin work. In addition to frequency separation retouching, Dodge/burn is applied as a secondary layer for contouring/dimension purposes.
Commonly used techniques
- Frequency separation
- Dodge/burn (contouring/dimension)
- Hair masking using pen tool or Select/mask
- Color grading (selective)
- Digital makeup enhancements
Each project has its own unique threshold for acceptable levels of retouching. Therefore, do not apply a generic industry standard to two different clients (i.e., natural skincare vs. Luxury cosmetics).
Also, document the level of retouching requested at intake. If applicable, also confirm whether your images will ultimately be printed or viewed digitally since printing at 300 dpi reveals artifacts created during retouching that remain invisible at 72 dpi.
Using AI and/or manual techniques for photo retouching
High Volume Repeat Tasks:
Generative fill in Photoshop, Lightroom’s AI masking, AI sky replacement in Luminar Neo, and Imagen AI Profiling have all significantly decreased average time per photo on the same high volume, repetitive work.
Whether you use an AI-powered technique or perform manual edits will depend solely upon the output fidelity needs and NOT on which method you prefer.
When to Use AI-Powered Editing:
You are working with batch sizes exceeding 200 images that include identical backgrounds and uniformly lit subjects. At these levels, using AI-powered techniques to assist in removing your subject from their background can save about 60% of turnaround time.
Your task is a simple global adjustment that includes normalizing exposures, adjusting white balances and correcting lens distortions that exist within a product shoot that has a consistent product as the main subject.
You are producing standard quality (web/ecommerce jpg) that does not require retaining fine details that could be lost during compression.
When to Edit Images manually:
Manual editing is required due to complex skin retouching. Although AI-based skin smoothing products may provide satisfactory results at low resolutions (i.e., 72 dpi) used for web publishing purposes; they cannot reproduce realistic skin textures at higher resolutions (e.g., 300 dpi) which are needed for printing. In order to preserve even the finest detail of skin texture, frequency separation should be performed manually.
To achieve creative compositing (perspective matching and aligning light direction between multiple source files), reliable AI-based composite solutions do not yet exist.
A high-end photo editing for commercial beauty campaign or advertising image where any level of AI-generated artifacts would be unacceptable to the client and therefore requires manual retouching.
End-to-end photo retouching with the right technique for every image
Let’s get started »How long does photo retouching take? Time benchmarks by technique
Time spent doing photo retouching can be as short as 2 min for simple color correction or as long as 6 hr. or more for creating a complete creative composite.
HabileData’s internal benchmarks reflect production times across retouching methods for ecommerce and portraits.
Factors that affect how your project falls along the range of these production times:
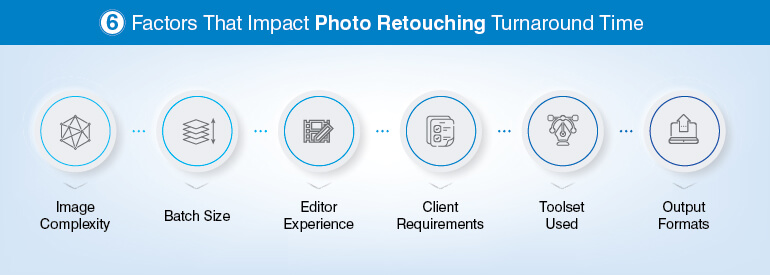
- Image complexity: Projects with simple composition, fewer elements, process faster than those with intricate details, multiple people or poor light which will take longer to process.
- Batch size: When completing 100+ images per session, it is necessary to create standards of technique and streamline your workflow so that there isn’t an impact on the speed of delivering each image without losing quality.
- Editor experience: More seasoned editors work faster and deliver higher quality results due to technique experience, especially when using frequency separation and compositing.
- Client-specific requirements: If client requests deviate from normal workflow e.g., use custom colors for reference, provide different sized outputs for one image, need a new direction during the middle of the project. The additional time required will be directly related to the complexity of the request.
- Software toolset: Using Photoshop Actions, Batch Processing Scripts, or AI-Assisted Tools to automate repetitive tasks will save editor time per image. Regardless of how skilled an editor is, they will always be less efficient if they’re using unfamiliar software.
- Output file format(s): Providing both JPEG, TIFF & PNG versions of the same edited image from a single retouch project requires exporting files which will increase total production time. Include this factor into your estimate at the beginning of the project.
Conclusion
The selection of retouching techniques is a systematic process, as opposed to an intuitive one. The application of factors such as Image Category, Output Platform, Source Quality, Client Intent, and Turnaround Constraint among others will help define the appropriate technique set prior to opening the file by the Editor. This results in consistent output, predictable turnaround time, and less revisions.
For companies with high-volume images exceeding their ability to manually edit images; for those requiring greater complexity than they can accomplish in-house; and for businesses that require all of these features consistently across multiple platforms, the use of professional editing services provides the most efficient means to achieve consistent output compliant with each platform.
Frequently Asked Questions
Both types of retouching enhance a subject’s appearance; however, beauty retouching takes it to the next step; skin, hair and make-up are optimized to achieve an aesthetic ideal based upon your clients’ specifications such as amount of skin smoothened.
Both styles use similar retouching techniques; however the type of application differs in terms of extent.
For specific image retouching tasks like frequency separation, dodging and burning, clipping paths and compositing, Adobe Photoshop will provide the most optimal results. When performing large-scale color corrections and adjusting color levels globally Lightroom and Capture one may be more suitable.
To perform high-volume batch processes without requiring individual manual editing, Imagen AI can apply pre-trained editors to each image within a shoot.
Costs vary depending on what is required to complete a task. Simple clipping paths or basic color correction techniques: $0.50-$2 per image. Standard portrait retouching services with minimal removals: $5-$25 per image.
High-end beauty and/or composited retouching with extensive removals: $50-$200 per image. Pricing also depends on volume, turnaround time, format and other factors related to delivery.
Frequency Separation separates an image into two layers, the first being the high-frequency layer which includes details of the image including skin texture (pores, fine lines, etc.) and hair.
The second layer is the low-frequency layer which contains information regarding the overall tone of the image.
As such, when working on both layers separately, a retouched is able to adjust the evenness of tone in the low-frequency layer without disturbing the texture of the image present in the high-frequency layer. Therefore, this method is generally considered the “gold standard” for Portrait and Beauty Skin Retouching.
You will know that it is viable to have in-house retouching options when you are only producing fewer than 50 images a week, and your in-house staff has an intermediate level of proficiency in Photoshop along with relatively loose turnaround times.
However, if you are exceeding your teams’ capabilities due to increased volume or need tighter SLA requirements or require higher levels of expertise beyond what your in-house staff can accomplish, then you will want to outsource.
Generally speaking, outsourced labor can provide you with up to 40-60% savings compared to hiring equivalent full-time staff internally.
Experience high-volume retouching with precision and cost control
Get your photo retouched today »


Snehal Joshi , Head of Business Process Management at HabileData, leads a 500-member team of data professionals, having successfully delivered 500+ projects across B2B data aggregation, real estate, ecommerce, and manufacturing. His expertise spans data hygiene strategy, workflow automation, database management, and process optimization - making him a trusted voice on data quality and operational excellence for enterprises worldwide. 🔗Connect with Snehal on LinkedIn